2011-01-18

A potato of jump packs

Is that the right collective term?  I'm not so sure.

I'm currently working on a 10 man assault squad and testing the paint scheme by starting with the jump packs.

This is how I've been handling/drying them:


It's actually worked quite well.  I drilled a tiny hole in each pack with a pin-vise and wedged in a cocktail stick; most of these have stayed put until the later rounds of drybrushing.

I've done this over a couple of evenings but I'm happy with the results and will be applying it to the marines soon.  It's a more subdued look than I've favoured in the past but it's in line with where I've been going recently style-wise.

It's also a lot faster.  I've not had much success painting batches before and end up spending too long on a single model.  I think this latest approach might actually get a me a decent shaded basecoat on the entire squad at under one hour per model.  I'm not sure how long the details will take but I'm planning on keeping that quick as well.  I'm pretty time-poor at the moment so the hobbying goes in stops and starts... mainly stops, so projects need to be quick and achievable.

The main time-sink is waiting for the washes to dry, the potato providing the perfect 'one night stand' that was required.  If it looks good, I might post about the method... if I don't let the blog die again!

2011-01-12

What a difference a year makes...

..or not, so it seems.

When I stuck together the doomed attempt at humour 'Being Funny on the Internet (TM)' in the previous post that killed my blogging enthusiasm, I never thought it was to be a prescient manifestation.

How surprised I was to see that it was not entierly unlike a Stormraven...


...with a Furioso Dreadnought on the back:


It would seem that someone at Games Workshop did take me up on my challenge and wrote some rules for it, not to mention releasing a multi-part plastic kit ;)

2010-02-23

Furioso Landspeeder!


"...more Dreadnoughts than any other Space Marine Chapter..."

I've had this in the back of my mind ever since that first press-release dropped and I finally got around to digging out the blu-tack and taking the picture :) I might have thought a librarian dreadnought would be as unlikely as this if it hadn't been for the official announcements!

I'd be interested in people coming up with stats for this thing, post your stat lines and special rules in the comments and I'll publish my favourite rules in a future post!

I'd love for people to run with this and create some more comedy dreadnoughts. First (imaginary) prize goes to the person who comes up with a fully painted Death Company Furioso Land Raider!

I've been really busy and haven't made much progress with the painting for a while but I'm determined to get somewhere before the Blood Angels codex drops. I didn't want the blog to die off in the meantime so I'm hoping this will provide a little light-hearted relief to tide it over until I can give the hobby some love :)

2010-01-24

Black is all the rage


This is where I will begin. The Death Company is where I got started in the hobby in the first place and so history will repeat itself. I've cleaned up mould lines, assembled and based the Death Company so they're ready to prime.

The chaplain is my favourite of the three I have available, one is the original Death Company chaplain, another is unassembled and is destined to wear a jump pack. I removed his bolt pistol and custom built a combi-melta out of a 2nd edition bolter and an autogun from Necromunda. I'm happy enough with it, it's quirky but balances out the pose of the model well. I got some melta-guns in the mail so I can always replace it with something more conventional but I'd like to see how it ends up when painted. The whole model will be getting an update.

For the bases I used the slate that comes with the 40k basing kit, I've also applied one of the resin pieces on the chaplain. I've never been great at the basing and conversion aspects of the hobby so it's interesting to start trying out a few things, even if they aren't all that adventurous just yet.

I'd like to try out a simplified version of the techniques detailed in the last issue of White Dwarf for painting Legion of the Damned. I'll be going for a warm scheme as they demonstrate on the weapons rather than the cooler blue that they use on the power armour.

I intend to post updates between steps so I can provide relevant commentary in managable snippets.

2010-01-23

Bitz delivery

I ordered a few basic bitz from Games Workshop which arrived yesterday.

The items were:


I didn't have any meltas and need one for the army, since they seem to be essential it can't hurt to have a few spare.

The flying base is to fix up a broken landspeeder. This is one of the metal ones from 2nd edition that they shipped on a tiny base for some reason. Of course it broke years ago after falling over and needs replacing with something more sensible.

The other bases are for several purposes. I have an original Blood Angels dreadnought (below) that never had a suitable base, there's a chance to do something a bit more interesting on the large base too.


I also have several terminators from before they started putting them on the larger bases as standard so I'll need to transplant them. I bought a bike squad at some point which came with cavalry bases, I think the newer bike bases are far more suitable. And the millions of small bases? Well I guess if the cats ever eat one I'll have plenty of spares. I do actually intend to mess about and try some different basing options which should also give me some practice.

I threw in the veteran because I liked the model and could do with another suitable model with a powerfist to act as a sergeant.

These parts should have filled in any gaps in building the initial 1000 points plus some of the things I'd like to do afterwards.

2010-01-22

Tactical re-awakening


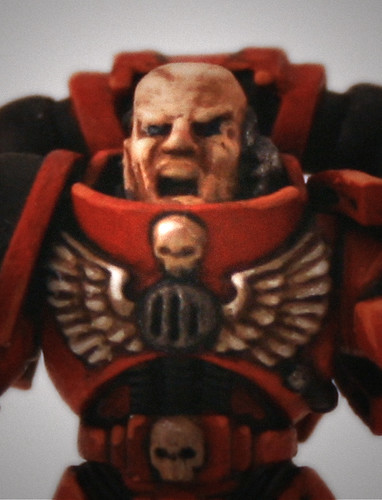
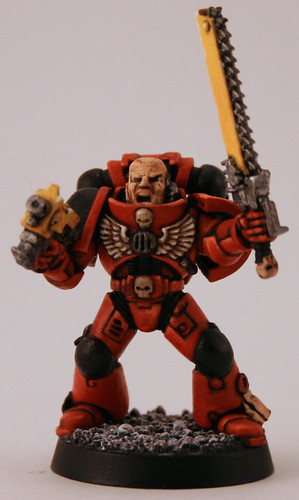
This tactical sergeant was my first attempt at a complete paint job since I regained my miniatures. As you can see, the newly constructed light box has seen its first action and it seems this guy is a bit of a poser, a natural in front of the camera. Here's a tale from a few months ago of how he came to be:

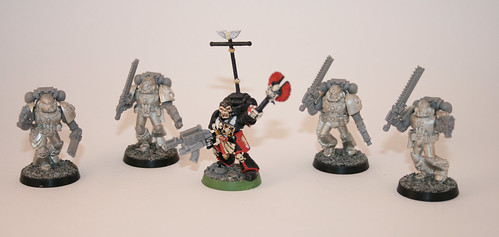
The sergeant is from the 3rd edition boxed set, one of the first highly-posable plastic marines. I actually built, based and undercoated the whole tactical squad quite a few years ago, one of the last things I did before my collection was relegated to storage (something to do with university, living away from home etc.) I painted one of the marines at the time, an early experiment with a black undercoat that went quite well.

After announcing to my parents that I would finally free up the space in their loft and knowing that I was soon to get these models back, I took a trip to the local store and found something new in the Foundation paints. These sounded perfect for working over a black undercoat so I picked some up along with a few other common colours I'd need and suitable brush.

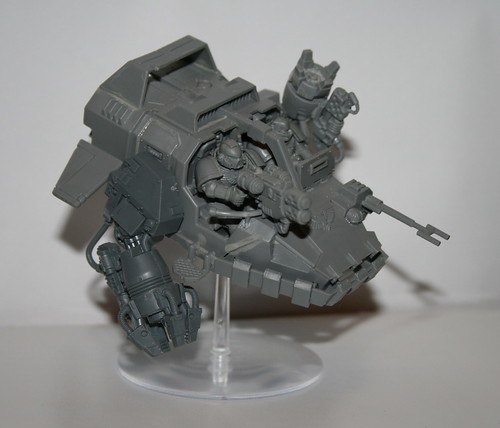
I also picked up an Ironclad Dreadnought from the store, another new addition since I'd been away. I'm a sucker for the walking hulks of metal and this was something new and interesting. I planned to use it as a Furioso but it looks like it may be viable as a real Ironclad in the new codex. Either option is fine depending on how the army list works out.

I built up my confidence with a brush by base coating this model but I started to feel it was a little large for a first project. Given that my collection had escaped from my parent's attic made their way to me I abandoned the dreadnought in favour of the tactical squad sergeant that was primed and ready to go. I'd also been taking a look at Jawaballs' blog and his videos on youtube that gave me some ideas to add to my plan.

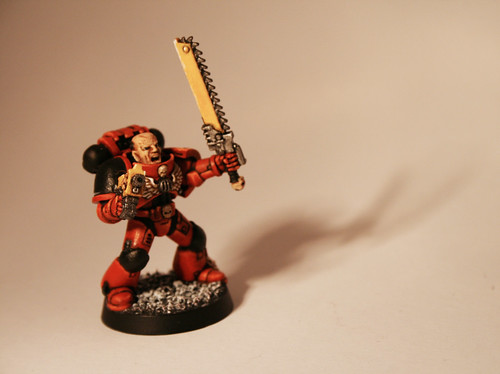
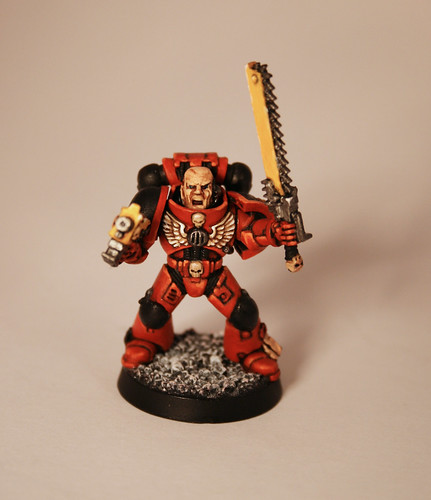
I started with a basecoat of Mechrite Red, covering the bulk of the surface but avoiding the crevasses. I then used Blood Red in much the same way, layering up steadily to cover the Mechrite, less so in darker areas. I think I used Baal Red to shade any areas that were too light and once that was dry Badab Black in the deeper recesses. I then tidied up the Blood Red areas before adding some highlights in Blazing Orange and then Fiery Orange (I believe this is discontinued but I had an old pot left that was still good).

Sergeant 2

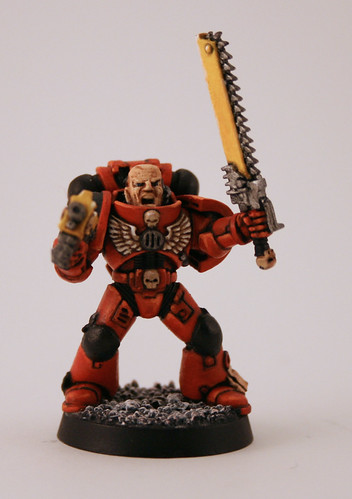
I approached the weapons and chest eagle in similar fashion, starting with a Foundation basecoat and working up through the shades. The eagle wings were painted Calthan Brown, working up to Bleached Bone and using a Gryphonne Sepia wash before applying more Bleached bone to the raised areas and repeating the wash. The weapons were painted Iyanden Darksun working up through Golden Yellow and Sunburst Yellow. I think the Gryphonne Sepia and Badab Black made a reappearance for shading. Both ended up with some pure white highlights at the very end.

Close up Sergeant 2

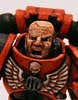
The face also began with a Foundation basecoat of Tallarn Flesh working up through another flesh tone (I think Elf Flesh) and a little Bleached Bone, rinsing and repeating with Ogryn Flesh.

The base just got a few drybrush coats of white. I haven't decided what look I'm going for on the bases of the army yet so this just helped finish it for now. Eventually they'll all be unified in some way.

Sergeant 3

That's about it. Overall I was quite happy with the results although I paid for it in shoulder tension and eye-strain. It took ages, and my lighting setup wasn't ideal. I'd also managed to smudge off some paint at one point from holding him by the base and head instead of attachiing his base to a paint pot or somesuch. I'm a bit of a perfectionist and kept going back and touching bits up all the way which added extra time.

Sergeant 5

I did enjoy process though and it was quite rewarding. I feel it was one of my better pieces, superior to anything I'd done when I was younger. I think having some years of reflection helps and I was just starting to get decent when I stopped.

Sergeant 6

It's clear that I can't spend this long on everything if I'm going to get an army done so I've been thinking about how to approach them and reading around a bit. From some further experiments on other tactical squad marines I've found that the shading on the armour has more impact than the highlighting and so I think I'm going to go with something like the following:

  • Black undercoat
  • Quick coat of Mechrite Red avoiding recesses
  • Blood Red coat
  • Baal Red and Badab Black for shading
  • Tidy up with Blood Red
  • Stop

With this approach I can batch paint a few at a time and get a good amount of units in a decent starting state. I can then go back and add more detail and highlights if I wish, I just don't want that to get in the way of progress.

We'll see how it goes anyway, I might completely change my mind and get drawn into something else. I'm already thinking I'll start with something that isn't even red but that is a topic for another post.

Meanwhile, I've decided to use this sergeant as my avatar :)

2010-01-20

Getting started

I'm almost ready to start attacking my Blood Angels army revival project with increased vigor.  I've ordered a few missing bits from Games Workshop and the fiancee is building me a light-box as we speak.  I'll probably choose one unit to focus on and post updates as I make progress.  Ideally I'd like to post material that is worth reading and perhaps even useful to someone so I'll try to discuss the approach I take in some detail.

The latest Blood Angels rumours are encouraging, perhaps there is little truth in it but I certainly like the general theme of mobility that's emerging.  I've always had a thing for dreadnoughts so plenty of opportunities to include them will also be highly welcome.

I also signed up to the blogger group run by From the Warp last night and I'll be adding the logo to my site in just a moment.  Thanks to Ron for the quick response and introduction, I'll be heeding his advice and trying to dip my toes in the community waters.